GPath Laser
Set Up Creality Falcon A1 with GPath Laser
Connect a Creality Falcon A1 to GPath Laser on Mac or Windows — USB setup, machine profile, first engraving project, and troubleshooting tips.
Last updated Jul 26, 2026, 11:41 AM
Download GPath LaserGPath Laser is desktop laser CAM software for macOS and Windows. This guide shows you how to connect a Creality Falcon A1 over USB, configure the built-in machine profile, create your first engraving project, and run a job from the app or export G-code.
GPath Laser detects detects the device automatically, applies the Creality Falcon A1 preset, and supports live control — connect, jog, frame, and run. In addition, G-code export for SD-card use.
Tested compatibility: The Creality Falcon A1 has been tested with GPath Laser over USB using the workflow below.
Table of contents
- What you need
- 1. Install GPath Laser
- 2. Preparing the Falcon A1
- 3. Add the Falcon A1 machine profile
- 4. Select the machine in your project
- 5. Connect over USB on next launch
- 6. Set up work origin
- 7. Create your first project (step-by-step)
- 8. Save G-code (optional)
- Troubleshooting
- FAQ
- Further reading
What you need
| Item | Notes |
|---|---|
| GPath Laser | macOS or Windows. Download from gpathsoftware.com. |
| Creality Falcon A1 | Pre-assembled- no assembly required for basic use. |
| USB cable | Data-capable USB (not charge-only). |
| Computer | macOS or Windows 10+. Close any other apps that may hold the serial port to allow connection. |
| Material | Plywood, MDF, acrylic, or cardboard for your first test engrave. |
Creality Falcon A1 specifications (for GPath setup)
| Spec | Value |
|---|---|
| Engraving area | 305 × 381 mm |
| Controller | GRBL (modified Creality firmware) |
| Serial speed | 115200 baud, 8N1 |
| Max S-value | 1000 (GRBL default) |
| Recommended post-processor | GRBL 1.1 Laser |
| Reference point/home | Bottom left |
1. Install GPath Laser
- Download and install GPath Laser for your platform from gpathsoftware.com.
- Launch the app and complete licence activation if prompted. Alternatively, a 30 day free trial is activated.
- On the welcome screen, click New Laser Project to open the drawing workspace.
2. Preparing the Falcon A1
- Power on the machine and wait for it to finish booting.
- Connect USB from the Falcon A1 to your computer.
- Close other laser software that might lock the port.
- Keep the safety lid closed during engraving — the Falcon A1 can pause or stop when the cover is opened.
3. Add the Falcon A1 machine profile
You can add the machine in two ways. Detect connected machine is recommended when the laser is plugged in.
Option A — Detect connected machine (recommended)
- Open Laser machine setup from either:
- Laser operations → Laser machine setup… (top menu), or
- The Setup button next to the machine selector in the right sidebar.
- Click Detect connected machine.
- GPath scans USB serial ports and probes the controller.
- When the Falcon A1 is found, you should see a message like Detected Creality Falcon A1 — added to your machines list.
- The profile is saved with USB serial connection enabled, so jog, frame, and run are available from the sidebar.
If the firmware banner contains Falcon and A1 (or Creality Falcon), GPath automatically applies the Creality · Falcon A1 catalog preset:
- Controller family: GRBL
- Max S: 1000
- Dynamic power: on (M4)
- Air assist default (vector cuts): on (M8)
Detected EEPROM values (work area, feed limits) are merged into the profile when the controller reports them.
- Click Save at the bottom of the setup window to persist your machine list.
Option B — Add from catalog (export-only or offline setup)
Use this if you want to design and export G-code before connecting the machine.
-
In Laser machine setup, click Add new machine.
-
Search or scroll to Creality · Falcon A1.
-
Adjust settings before adding:
Setting Recommended value max S 1000Feed display mm/minWork area W×H 305 × 381mmReference point Bottom-left -
Click Add machine, then Save.
Set as default (optional)
In Laser machine setup, mark the Falcon A1 as your default machine for new projects. New laser projects will then use its work area and reference point automatically.
4. Select the machine in your project
- In the right sidebar under Laser, open the machine dropdown.
- Choose Creality Falcon A1 (if not already selected).
- The project canvas resizes to the profile work area when width/height are set.
If Auto-home when connected is enabled in machine setup, GPath automatically sends a home command to the machine to return the laser to the home position on USB connect. You can also tap the Home icon in the center of the jog pad (Move tab).
5. Connect over USB on next launch
- With the Falcon A1 selected and USB plugged in, open the Laser sidebar.
- Go to the Connection tab.
- Click Connect.
When connected, the status indicator turns green and shows the controller state. Useful tabs:
| Tab | Purpose |
|---|---|
| Connection | Connect / disconnect, refresh probe |
| Position | Origin mode, frame/run origin |
| Move | Jog pad, go-to XY, set origin (G92), home |
| Camera | Enable toe machines built-in camera to overlay the canvas, useful for positioning drawings |
| Console | Console — send $I, $$, $H, etc. |
Console quick actions (GRBL)
On the Console tab, use quick buttons for Status, Info, Settings, and Unlock (unlock after an alarm), and Clear to clear the console. Sending is blocked while a job is running.
6. Set up work origin
How you place the job on the bed depends on the Origin mode on the Position tab.
Absolute origin
Machine work zero (0, 0) matches the project reference origin (corner or center of the canvas, set in machine setup). Use this when you align the bed to a fixed point on the material.
- Jog the laser head to where the project origin should be on your stock.
- Click Set origin on the Move tab.
- Use Go to origin to return to
(0, 0)before a run.
The red cross indicates the lasers origin/home position:
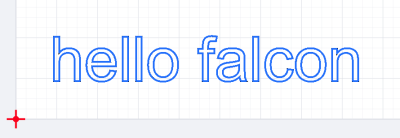
This example will assume the laser head is at this red cross position, and draw the text in relation to it.
Current origin (live head)
The job starts wherever the laser head is when you press Run or Frame. Useful for placing a cut at a specific spot after jogging.
- Select Current on the Position tab.
- Use the Job origin selector to set start position.
- Jog to the desired start position on the Move tab, and set origin.
- Press Frame (outline at power 0) to verify placement, then Run.
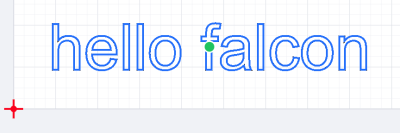
For example, setting the job origin to center:

Will assume your current laser location is in the center of the job, indicated by the green dot:
7. Create your first project (step-by-step)
This walkthrough engraves a simple text label on a piece of scrap material. It covers drawing, assigning a laser operation, previewing, and saving — everything you need before pressing Run.
Step 1 — Start a new laser project
- From the welcome screen, click New Laser Project.
- If you set the Falcon A1 as your default machine, the canvas opens at 305 × 381 mm with Bottom-left reference. Otherwise, open Laser machine setup, select the Falcon A1, and set work area to 305 × 381 mm.
Step 2 — Draw your design
Use the left toolbar Draw section:
Option A — Text
- Click the Text tool in the left toolbar.
- Click the canvas to set text position.
- Enter your text (e.g.
Hello Falcon) in the shape editor on the right. - Set font size and position. Center the text on the canvas for an easy first run.
- Click Create to place the text on the canvas.
Option B — Simple shape
- Click Square or Circle in the left toolbar.
- Set dimensions in the right sidebar (e.g. a 50 mm square).
- Click Create.
Option C — Import artwork
- File → Import… to bring in SVG, DXF, PDF vectors, or a bitmap image.
- Vector files become editable shapes, raster images create an Image operation automatically.
Step 3 — Add a laser operation
-
Open the Toolpaths tab in the right sidebar.
-
Click the Line button (outline icon) to create a vector engrave/cut operation.
-
In the operation panel:
- Operation type:
Line— follows the shape outline. - Power: start at 20% for a light engrave on scrap; increase for deeper marks.
- Cut speed: 6000 mm/min (default).
- Travel speed: 3000 mm/min (default).
- Passes:
1for engraving; increase for cutting through thin material. - Dynamic power: leave on (M4 — scales power with feed for cleaner corners).
- Air assist: leave on for vector cuts (M8).
- Operation type:
-
Link the operation to your shape:
- With the Line panel open, click the text/shapes to apply the line operation to. This will highlight the selection.
-
Save
You can also select a vector on the canvas and right-click to quickly create a line of fill operation.
For a filled area (solid block engraving), use the Fill button instead of Line. Adjust line spacing (default ~0.15 mm) and angle in the Fill section.
For a bitmap photo, use Image (or import a PNG/JPG via File → Import…). Tune gamma and white threshold in the Image section.
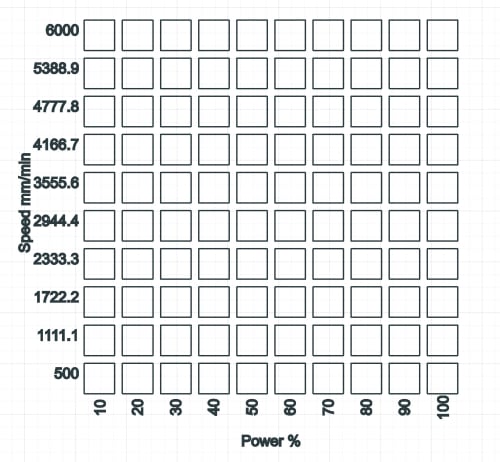
Tip: For a new device or material, it is recommended to run a material test grid. You can find this in the top navigation bar > laser operations > material test grid.
Step 4 — Preview the toolpath
- The canvas shows the toolpath overlay once the operation is linked and generated.
- Open the Laser Simulator tab (central pane) to step through the job and verify paths before burning.
- Check that the design fits inside the 305 × 381 mm work area.
Step 5 — Save your project
- File → Save Project (⌘S / Ctrl+S).
- Choose a location and name (e.g.
my-first-falcon.gpath-laser).
Saving preserves your shapes, operations, and machine settings so you can reopen and rerun later.
Step 6 — Place material and set origin
- Secure a scrap piece on the laser bed.
- Connect on the Conn tab (section 5).
- Home the machine if not alread done automatically.
- Jog the head to where you want the design to start on the material.
- On the Move tab, click Set origin (or use Current origin mode on the Pos tab).
Step 7 — Frame, then run
- Click Frame — the head traces the job boundary to check. Adjust position if needed.
- Close the lid, confirm air assist if connected, and click Run.
- Watch the first few lines- press Stop if placement or power looks wrong.
Tip: Always run Frame before your first burn on a new material or placement. Start with low power and one pass, then dial in settings for your stock.
8. Save G-code (optional)
To run the file from the machine's SD card or another sender:
- File → Save G-code… (or the save action in the toolpaths sidebar).
- Confirm the post-processor is GRBL 1.1 Laser (automatic for the Falcon A1 profile).
- Select toolpaths to save, and choose a save location.
Troubleshooting
Port not listed or connect fails
- Unplug and replug USB or try a different cable or port.
- Quit any other design software, and any serial terminal.
- On Windows, install the USB driver if Device Manager shows an unknown device.
- Click Refresh on the Connection tab after replugging.
"Unrecognized controller"
- Ensure the machine finished booting before connecting.
- Check the Console tab for a GRBL banner (should mention Creality / Falcon).
Alarm / lock state
- Open the Console tab and send Unlock to unlock after clearing the fault (e.g. lid opened mid-job).
- Home with
$Hor the jog pad Home button before restarting.
Wrong scale or position
- Confirm work area is 305 × 381 mm in machine setup.
- Re-check origin: Set origin on Move after jogging to the correct corner.
- Use Frame before Run to verify placement.
Power seems too weak or too strong
- Verify max S is 1000 in the machine profile (not 255).
- Adjust operation power % — 20% is a safe starting default for engraving, cutting may need higher power and more passes.
- Run
$$in the console and compare$30(max spindle/laser speed) with your profile max S.
FAQ
Does GPath Laser work with Creality Falcon A1?
Yes. The Falcon A1 has been tested with GPath Laser over USB. GPath includes a built-in Creality · Falcon A1 profile and auto-detects the machine when connected.
Can I use GPath Laser instead of Falcon Design Space?
GPath Laser supports design, toolpath generation, USB streaming, and G-code export for GRBL lasers including the Falcon A1. You can use it as your primary workflow or alongside other software for specific features.
What file format does GPath Laser use?
Laser projects are saved as .gpath-laser files. G-code is exported separately as .gcode or .nc via File → Save G-code….
What G-code post-processor should I use for Falcon A1?
GRBL 1.1 Laser — selected automatically when the Creality Falcon A1 profile is active. It outputs M4 dynamic power, M8/M9 air assist, and standard GRBL laser commands.
What is the Falcon A1 work area in GPath?
305 × 381 mm. Set this in Laser machine setup under work area width and height.
How do I engrave a photo on the Falcon A1 with GPath?
Import a PNG or JPG via File → Import…, this will automatically create an image operation in the Toolpaths sidebar. Adjust power, speed, gamma and white threshold etc, then frame and run.
Can I run G-code from an SD card?
Yes. Export with File → Save G-code… using the GRBL 1.1 Laser post-processor, then copy the file to the Falcon A1 SD card and run it from the machine panel.
Further reading
- GPath Laser documentation — in-app guides and reference
- Sculpfun S9 5W setup guide — 5w diode laser setup