GPath Laser
Finding your way around
Last updated Oct 14, 2026, 6:31 PM
This guide walks you through the project view in GPath Laser.
1. The project workspace
The project screen is where you design, create laser operations, simulate, connect to your machine, and export G-code.
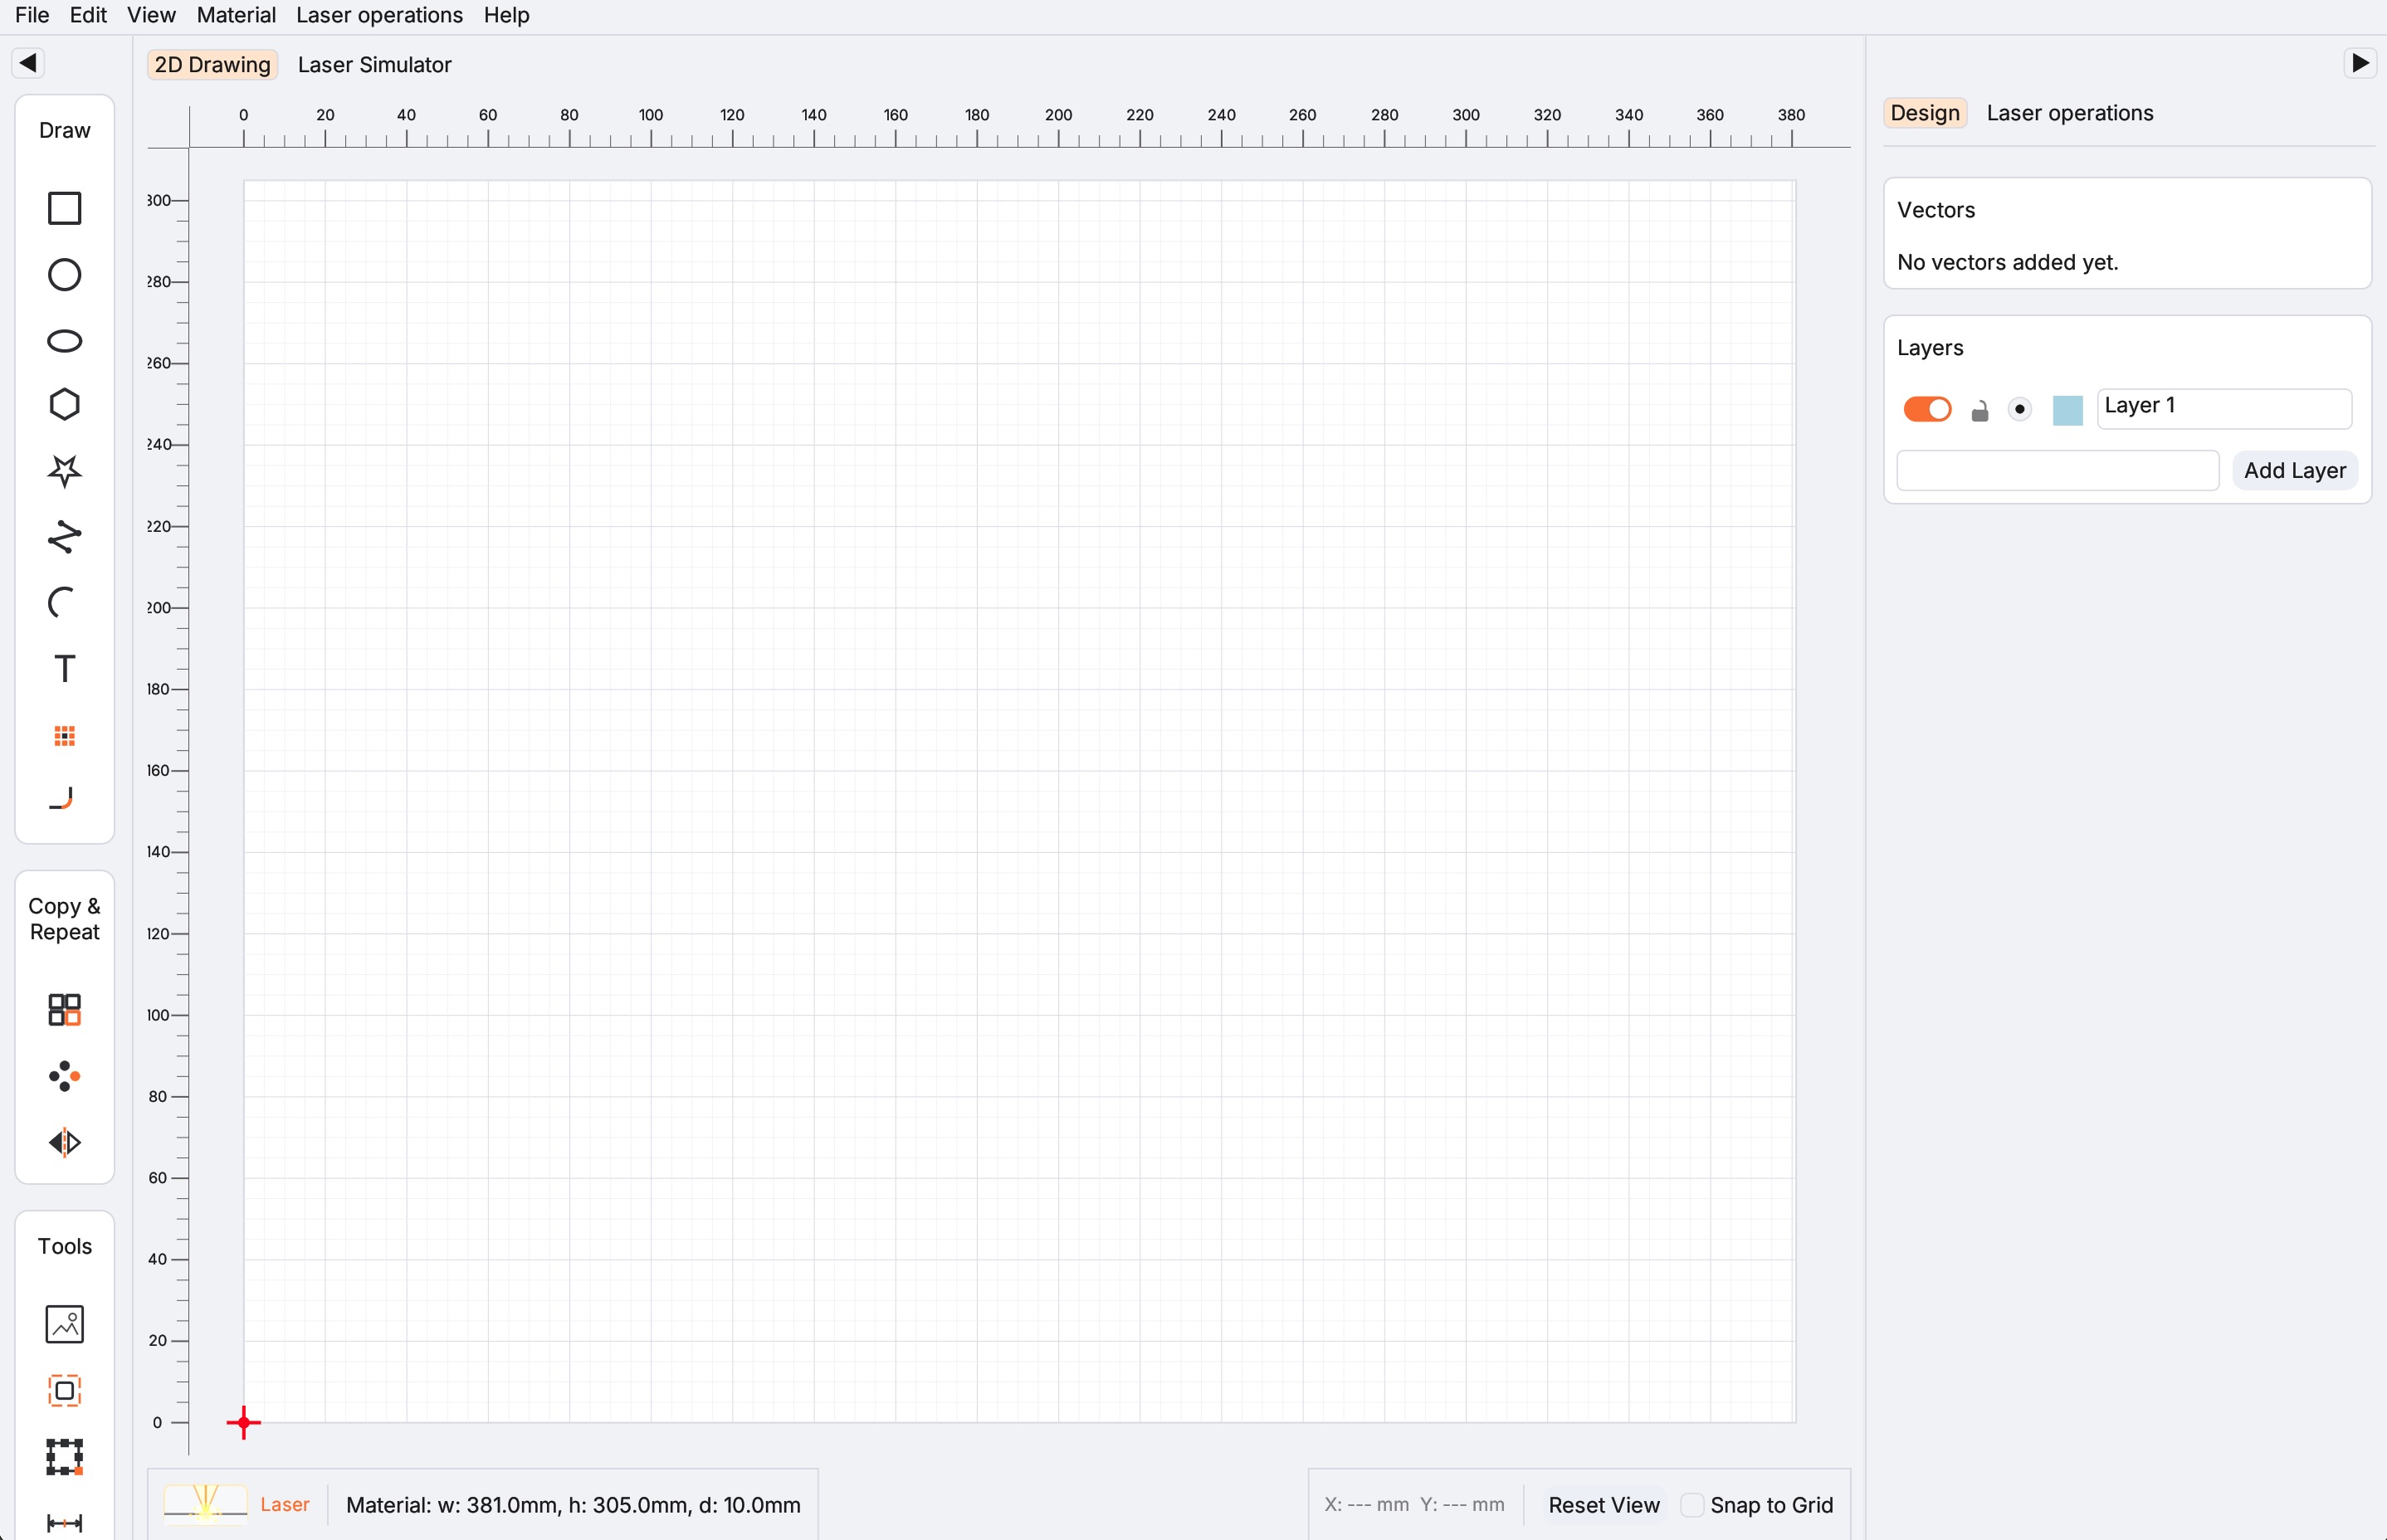
Central tabs
| Tab | Purpose |
|---|---|
| 2D Drawing | Primary design canvas — draw, edit, and place artwork |
| Laser Simulator | Preview generated G-code with a toolpath animation |
New and opened projects always start on 2D Drawing.
Left toolbar
The left toolbar groups tools into sections:
Draw
- Square, Circle, Ellipse, Polygon, Star, Polyline, Arc, Text, QR Code
Copy & Repeat
- Repeat (Grid), Repeat (Circular), Mirror
Tools
- Import artwork (vector), Offset, Transform, Measure, Guideline, Boolean, Join
Selecting a tool under Draw or Copy & Repeat opens a panel on the right sidebar with various inputs. New shapes from Draw are placed at the work area centre by default. This does not apply to the Tools section — those act on the current selection or canvas rather than opening a create form.
Toggle View → Vertical left toolbar (stacked tool icons) to switch between a horizontal icon strip and a vertical stack.
Right sidebar
The right sidebar has two tabs:
| Tab | Purpose |
|---|---|
| Design | Layer list — add, rename, reorder, and toggle visibility of drawing layers. List of vectors to edit or delete. |
| Laser operations | List of Line and Fill operations, toolbar to create new operations |
Below the operations list, the Laser machine panel provides Run / Stop, Frame, connection controls, jogging, and a Camera tab for live overlay. Use the Origin tab to choose Absolute vs Current work origin. Align the bed and straighten fisheye distortion under Camera calibration.
On narrow screens the right sidebar can be collapsed; use the toggle on the edge of the canvas to reopen it.
Bottom info bar
Shows cursor position, selection details, and contextual status while you work.
2. Top menu bar
File
| Item | Action |
|---|---|
| New Project (⌘N / Ctrl+N) | Return to welcome screen to start fresh (prompts to save if modified) |
| Open Project… (⌘O / Ctrl+O) | Open an existing .gpath file |
| Import… | Import vector or raster artwork (see import formats below) |
| Generate → QR Code… | Create a QR code shape on the canvas |
| Save (⌘S / Ctrl+S) | Save the current project |
| Save As… | Save under a new filename |
| Back to Welcome Screen | Return to the welcome screen (prompts to save if modified) |
Edit
Standard editing commands: Undo, Redo, Copy, Paste, and shape deletion. See Help → Show Hotkeys for the full list.
View
Toggle canvas overlays:
- Show Center Grid
- Show Reference Point
- Show Rulers
- Show Cursor Cross
- Show Grid
- Show Guidelines
- Show Toolpath Start Positions — markers for closed Line cut starts (see Start Position Selection)
- Show preset library below laser operations — material/thickness presets under the operations list
- Vertical left toolbar
- App theme (Dark / Light)
Material
| Item | Description |
|---|---|
| Drawing Unit… | Switch between mm and inch for the canvas and operation parameters. Work area dimensions convert with the unit change. |
| Edit Home Position | Set Home X and Home Y (where the machine returns after a job) |
Reference point and work area size are stored on the laser machine profile, not edited directly here. Change them in Laser operations → Laser machine setup… (or switch to a different machine in the Laser operations sidebar).
Laser operations
Create and export laser jobs:
| Item | Description |
|---|---|
| Line | Vector cut or score along shape edges |
| Fill | Raster fill / engrave inside closed shapes |
| Laser defaults… | Global Line and Fill parameters for new operations (speed, power, passes, etc.) |
| Laser machine setup… | Add, edit, or remove saved machine profiles |
| Save laser operations | Export G-code (enabled once at least one operation exists) |
Help
- Show Hotkeys — keyboard shortcut reference
- Licence — view or manage your licence from within a project
3. Draw your first shape
With the project open on 2D Drawing:
- Click Square in the left toolbar (under Draw).
- The right sidebar opens a New Square form with Position, Size, Corner Radius, and Rotation sections. Defaults are centred on the work area (based on your machine profile's width and height).
- As you edit the fields, a live preview of the square appears on the canvas.
- Click Save Changes (or press Enter) to commit the shape. It is added to the active layer and listed in the Design tab of the right sidebar.
Pan and zoom
- Scroll the mouse wheel over the canvas to zoom in and out (zoom centres on the cursor).
- Middle-mouse drag pans the view.
- The work area boundary is drawn as a rectangle matching your machine profile dimensions.
Import instead of drawing
Use File → Import… or the Import button in the left toolbar to bring in existing artwork.
Import formats
| Type | Extensions |
|---|---|
| Vector | .svg, .dxf, .pdf, .ai |
| Raster | .png, .jpg, .jpeg, .tif, .tiff, .webp, .gif |
Vector files add editable paths to the canvas. Raster images can be traced into a Fill laser operation automatically during import.
Raster images auto create a laser operation (to engrave the image) when imported. You will see this under the laser operations tab.
QR codes
Use File → Generate → QR Code… or the QR Code tool in the left toolbar to place a scannable code on the canvas, then assign a Fill operation to engrave it (Line operation may make qr code difficult to scan).
4. What to do next
Once you have geometry on the canvas:
- Review laser defaults — Laser operations → Laser defaults…. Set baseline speed, power, and passes for new Line and Fill operations.
- Create a Line operation — Laser operations → Line, or click the Line icon in the Laser operations sidebar toolbar. Select shapes, set power (%), speed, and passes.
- Create a Fill operation — Laser operations → Fill for raster engraving inside closed shapes.
- Simulate — Switch to the Laser Simulator tab to preview the job.
- Connect and run (USB machines) — In the Laser operations sidebar, open the Connection tab, select your USB port, click Connect, then Run. Manual (non-USB) profiles export G-code only.
- Export G-code — Laser operations → Save laser operations once at least one operation has been created.
- Save your project — File → Save or ⌘S / Ctrl+S to preserve your design and operation settings in a
.gpathfile.
Optional: material presets
Inside the Laser operations tab, you have access to the preset library. Store favourite speed and power combinations per material/group and apply them when creating new operations.
Presets are arranged into:
- groups are used to group related presets (group name/aterial name etc)
- presets are for saving laser operations intended to be re-used. E.g. common engrave settings for a material or frequent design.
Troubleshooting
I can't click New Laser Project Activate a trial or licence in the welcome sidebar. The card stays disabled until your trial or licence is active.
My canvas size is wrong Edit the machine profile's work area in Laser machine setup…, or pick a different machine. Work area is only applied to empty projects — existing geometry is not rescaled when you change machines.
My coordinates don't match the machine Check the Reference point on your laser machine profile. It must match your controller's work-coordinate origin. Changing it repositions existing shapes to preserve their physical location.
Power in G-code seems wrong Verify max S on the machine profile matches your firmware (255 vs 1000 vs 10000).
I can't connect over USB Only profiles with USB serial detection (or manually configured USB machines) show live connection controls. Currently only grbl style controllers are supported. The No machine template is manual/export-only and shows Offline profile.
I need to go back to the welcome screen Use File → Back to Welcome Screen or File → New Project. You will be prompted to save unsaved changes first.