GPath CNC
Raised text
Last updated Jul 26, 2026, 11:41 AM
Raised text (also called relief lettering) leaves the letters at the original surface while clearing material around them.
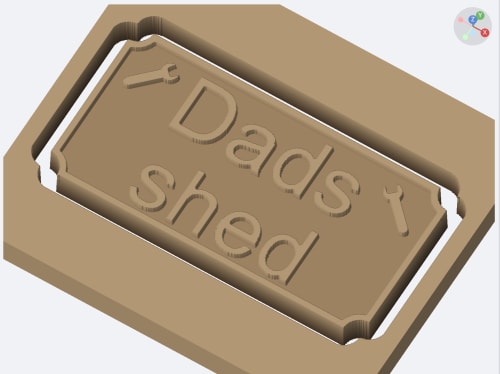
In GPath CNC you create this with an outer closed shape, text nested inside it, and a pocket that uses Subtract nested shapes.
For this to work, both the outer shape and the text need to be added to the same pocket toolpath, with subtract nested shapes enabled. The tool also needs to be small enough to fit between the lettering detail.
The pocket clears the background, the letters remain as raised islands.
1. Draw the outer shape
Create a closed outline for the plaque or panel, such as a square or circle.
Size it to your stock and leave enough margin around the lettering for the tool to clear.
2. Add the text
- Click T (Text) under Draw.
- Click the canvas inside the outer shape to set the insertion point.
- Enter your wording, choose font and size, then click Create Text.
Keep letter height large enough for your end mill. Narrow strokes and tight counters need a smaller tool. See Text for font, size, and alignment controls.
3. Nest the text inside the outline
The text must sit fully inside the outer shape. Drag it with Transform if needed.
GPath treats shapes that sit inside another selected shape as nested. That nesting is what Subtract nested shapes uses to leave the letters solid.
4. Create the pocket toolpath
- Select the outer shape and the text (both).
- Open the Toolpaths tab and click New Pocket/Area Clearance Toolpath, or right-click and choose New pocket toolpath from selection….
- Assign an end mill from the tool library.
- Enable Subtract nested shapes.
- Set Start Depth and Finish Depth — finish depth is how far below the surface the background is cleared (the letter height of the relief).
- Choose Zigzag (Raster) or Offset (Spiral) clearing.
- Save the toolpath.
With subtract enabled, GPath CNC pockets the area between the outer boundary and the letter outlines, and clears letter counters, while leaving the letter faces uncut.
5. Check tool size
If the tool is too large for the lettering, narrow gaps and counters will not clear cleanly. The pocket panel can warn when the tool diameter is large relative to text height — reduce the tool size or increase the font size until strokes and counters are machinable.
A finishing allowance on zigzag or offset pockets cleans the walls around the letters when the selection is not text-only.
6. Preview and export
- Use the toolpath preview and material-removal simulator to confirm the background is cleared and the letters remain.
- Check counters in closed glyphs (O, A, 8, and so on) — they should be pocketed, not left as solid disks.
- Export G-code for your machine post-processor when you are ready to cut.
Optional: add a separate profile (Outside) on the outer shape afterward if you also want to cut the plaque free from the sheet. Use bridges / tabs on that profile if the part should stay attached until you free it.
Tips
| Tip | Why it helps |
|---|---|
| Larger text, smaller tool | Improves clearance in counters and between letters |
| Leave margin around the text | Gives the tool room to enter and clear the background |
| Relief depth vs material | Shallow relief reads well on signs, deeper relief needs a stiffer setup |